Monthly Archives: February 2014

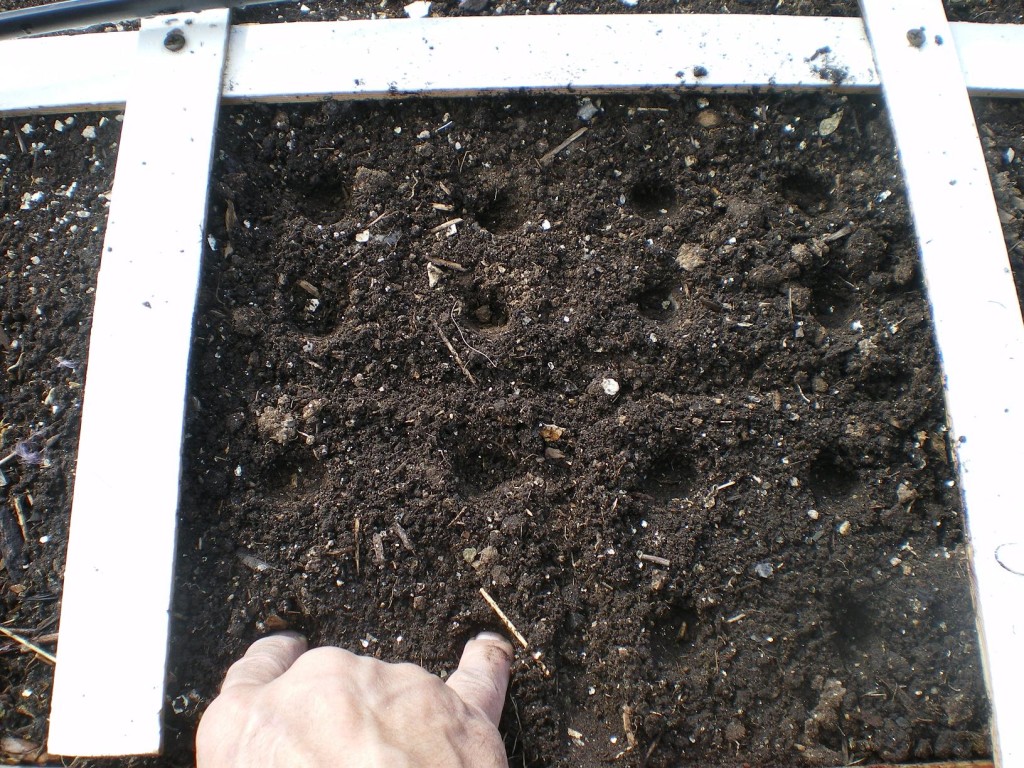
Step 4: Start planting!

spacing shot-9 per squarespacing shot-16 per squareIt’s that easy! This is all you need to have a great garden. Now all that’s left is the spacing. In the SFG system, this is simple too. As a general rule things will be planted in 1, 4, 9, or 16 items per square. You’ll know by what the seed packet lists as the “thin to” spacing. As an example, broccoli will say “thin to 12.” This means there will be one broccoli plant per square. If you’re using transplants it’s easy-just drop it in the middle of your square. If you’re using seeds, you only need to add 2 or 3 seeds into each hole. That’s it! If all 3 of those seeds grow you can either cut them back with a scissors(a tough thing to do)or you can gently come under the early starts with a pencil and carefully lift them out. You now have another broccoli plant that’s germinated and can become a full plant. If the packet says “thin to 6 inches” you will plant 4 items per square. “Thin to 4 inches” will mean you’ll plant 9 items per square, and the last one-“thin to 3 inches” means you’ll be planting 16 items per square. The following is a short list of the spacing used in the SFG system. One per square: broccoli, cauliflower, eggplant, tomatoes, kale, brussel sprouts, basil, rosemary, and cabbage. Four per square: all lettuce, chard, pok choi, radicchio, arugula, marigolds, nasturtium, and cilantro. Nine per square: beets, leeks, chives, spinach, garlic, onions, mizuna, tatsoi, kohlrabi, and bush beans. Sixteen per square: radishes, turnips, parsnips, carrots, mache, and scallions. Keep your soil moist-especially at the beginning and you’ll be rewarded with a garden that you never knew could be so much fun and so little work.[ois skin=”below post”]

Step 3: add a grid

wood lath for gridcompleted gridYou can buy these at Home Depot or similar store for about 55 cents each. For each 4X4′ box you’ll need 6 pieces of this wood lath. It’s perfect because it comes in 4′ lengths. Then mark off each grid at the 1 foot line-you can see them in the first picture. So each 4′ piece of wood lath will have 3 marks on it-1 at the 12, 24, and 36″ measure. Then it’s just a matter of putting 3 grids on the bottom, and then the remaining 3 grids perpendicular to them, lining up the holes, and screwing them all together. These are bought from the store in their natural color but I paint mine white. It’s a personal thing-I like my grids to stand out. Now place your grid on the garden box and you’re ready for the last step. And you don’t need to nail them down. I don’t and they’ve never been blown off. There are several reasons for the grid but the primary one is that it breaks up your 4X4′ box into 16 equal squares. Each one of these squares will hold something different. If you don’t have a grid you’ll be tempted to do the same thing you’ve always done in your garden-you’ll start planting in rows. Your grids can be made out many things. I like wood because it lasts the longest. I bought all vinyl many years ago and after 3 years they all broke from brittleness. I think I just threw away my original white wood grid a few days ago. It lasted me for 15 years.[ois skin=”below post”]

Step 2: fill it with the right soil

gardner & bloome compostIf you don’t have the right soil mix, it’s a gamble on whether or not you’ll have a great square foot garden. The perfect soil can be made-mixed-in less than 20 minutes. What’s the main complaint during the garden season with your neighbors besides weeds? It’s “my soil is terrible…” The perfect soil is made up of equal parts-by volume not weight-of peat moss, compost, and course vermiculite. If you can’t find course, get medium. If you can’t get medium, get fine. If you can’t get vermiculite at all, don’t buy perlite. It’s useless in these gardens. This gets to be rather pricey, but it’s a one time expense if you make your own compost. If you don’t, you’ll always need a bag of compost around to amend your soil throughout the year. I bought one of those Rubbermaid tubs at K-Mart-the kind with ropes on each end. It’s simply a matter of filling that up to the top with peat moss and dumping that in your box. Do the same thing with the vermiculite and the compost. Mix it all up and wet it down. It’ important to do this. These gardens hold a tremendous amount of water because of the vermiculite. And that’s one of the main reasons we use it. I’ve made my own compost for 14 or 15 years and it’s easy. It’s also free with all the waste ingredients that come out of your kitchen. If I had to go out and buy commercially available compost, this is the variety I recommend. It doesn’t have any wood chips in it, and it doesn’t have any peat moss. This is unlike the Kellogg’s brand which has quite a bit of wood chips in it. This product has 8 or 9 different things in it which make it an excellent choice. How much soil will you need? Easy. All you do is take the measurements of your garden box. Let’s say it’s a single 4X4′ box. 4X4=16. Because you only need 6 inches of soil, you now cut that number in half. So that leaves you with 8 cubic feet of soil ingredients that you’ll need to fill your box. That means you will need approximately 3 cubic feet of vermiculite, 3 cubic feet of compost, and 3 cubic feet of peat moss. If you box was 4X8′ it would be different. 4X8=32. 32 divided by 2 equals 16. So this means you would need approximately 5 cubic feet of each of the 3 ingredients, plus a tad more to finish it off. I use compost to finish everything. Pretty simple. Now you have your box and it’s filled with the perfect soil that took you 20 minutes to mix. You’re almost ready…

[ois skin=”below post”]

Step 1: build a box

2X4 SFG boxIt can be any length you’d like but it shouldn’t be any wider than 4′. It can be shorter than that too-just like the picture. This is for our daughter and son-in-law. They don’t have a lot of room so this 2X4′ will fit perfectly for them. That’s only 8 squares of planting. We’ll be filling it with crops that love cold weather, are easy to grow, and that taste great(doesn’t it all?) Your box can be made out of wood, vinyl, bricks, ammo boxes(although they’re a little deep), railroad ties(the newer ones), etc. Screw them together with regular deck screws-at least 2 on each side and preferably 3. Be sure to rotate the corners as it shows in the picture. Try to make sure you put it in a place that gets a minimum of 6-8 hours of sun. And how deep does it have to be? Only 6 inches! That’s it! These are 2X6″ pieces of wood that I picked out of a trash bin near some new construction in the neighborhood. Free wood is the best! It takes about 10 minutes to drill this together. Next up: step 2-the perfect soil and my recommendations for commercially available compost. This is one of the biggest things to understand about the SFG system. If you get this wrong, all the other advantages of SFGing go away. It’s the biggest reason for failing in the SFG system.

[ois skin=”below post”]

Leeks

leeks in potmaker-20814I like to take some time and think ahead of what I want to eat and when I want it. Take leeks as an example. I grow three different varieties that mature at different times-one finishes in 90 days, another 110, and the last one in 120 days. You can’t direct seed leeks in February in Utah-they wont make it. When you do direct seed leeks in the garden, you have to “hill” them as they get longer. The reason for this is the most coveted section of the leek-the white shank. If you don’t hill them you’ll end up with just a small section of white. I don’t have time for that so I start them inside and then place them in the garden in small holes that are 8-9 inches deep. In this way we’re able to get a solid section of white that’s just delicious. The variety pictured here is Megaton and it matures in 90 days. That means they’ll be finished by early to mid April-perfect for me and my customers. Think ahead to crops that take a long time to mature and start to plant some of them inside. It’s just a timing thing for me.

[ois skin=”below post”]